Getting Started with NeuroPilot-Micro & Tiny Machine Learning on MT3620
- Getting Started with SDK
- NeuroPilot-Micro SDK - Getting started with NeuroPilot-Micro by a simple example
- Getting Started with Demos
- Tiny Vision Demo - Step-by-step reproducing the camera-based demos
- Dual-Core Processing Demo - Step-by-step reproducing the dual-core processing demo
- Handwriting Recognition Demo - Step-by-step reproducing the touch-based demo
- Learn More
- Tiny Vision Platform - How to assemble the camera-based demo hardware platform
- Handwriting Platform - How to assemble the touch-based hardware platform
- MT3620 Development Board - Brief introduction of MT3620
Getting Started: NeuroPilot-Micro SDK
NeuroPilot-Micro is a part of NeuroPilot and specifically designed for Tiny Machine Learning applications. It leverages NeuroPilot optimization tools and provides popular Neural Network frameworks for inference. NeuroPilot-Micro SDK supports TensorFlow Lite for microcontrollers (TFLm) and optimization APIs for model inference and optimization.
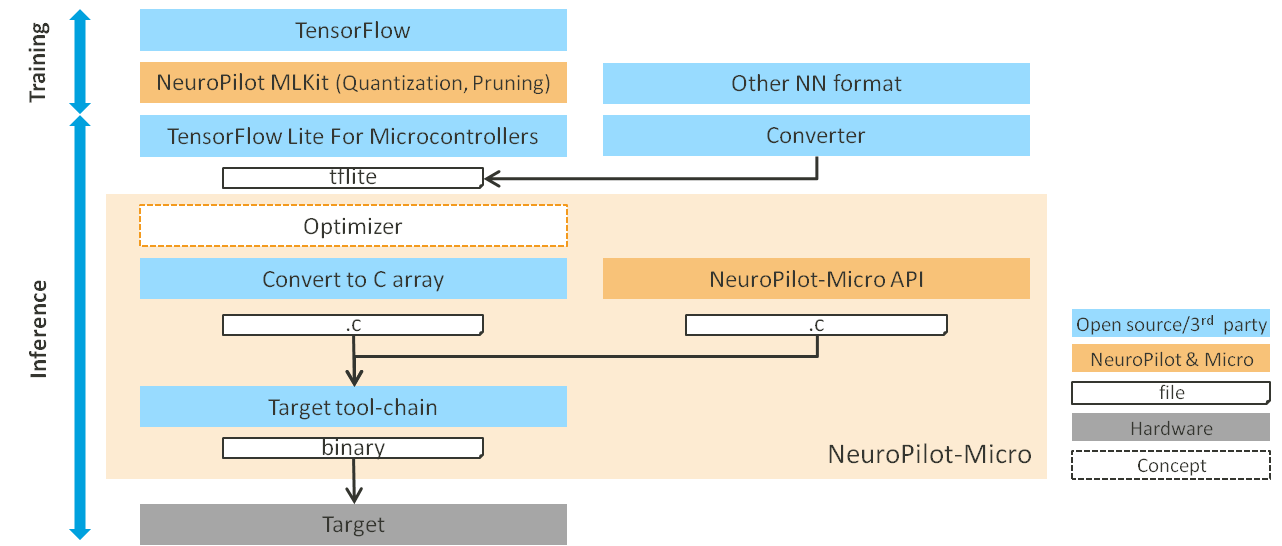
NeuroPilot-Micro can be split into two parts: (1) model training and (2) model inference.
The upper part highlights model training, TensorFlow and NeuroPilot MLKit can be used to train and optimize (e.g., quantization and pruning) the models. In addition to the tools provided by TensorFlow, other neural network tools and converters can be used as long as the model can be transferred into the TensorFlow Lite format.
The lower part is for model inference. The trained model is converted into the TensorFlow Lite format and the result is a FlatBuffers format that is a model file with .tflite filename extension. The .tflite is converted to C array for a non-file system OS. The NeuroPilot-Micro SDK framework is responsible for run-time, resource arrangement, and optimization. Finally, the target toolchain combines all these elements together in a binary file that can be run on the target hardware platform, such as one using the MediaTek MT3620.
With NeuroPilot-Micro frameworks, the model will run efficiently on MediaTek platforms. Using the MT3620 as an example, the model running using Flash as a larger-but-slower pool of memory, yet still can be as fast as at TCM (smaller and faster memory). This helps developers easily run the inference model and we recommend they use Flash for models.
How to run Inference with NeuroPilot-Micro
The following sections will introduce how to run inference with a Neural Network model on a target device with NeuroPilot-Micro. It includes the following:
- Brief Introduction of TensorFlow Lite for Microcontrollers
- Step-by-Step Information on how to run inference at a target
- Optimization Guidelines
TensorFlow Lite For Microcontrollers
TensorFlow Lite for microcontrollers (TFLm) is a part of TensorFlow Lite project, with specific support for the microcontroller ecosystem. Due to the computing performance and memory limitations of a microcontroller, the TFLm implementation is lightweight and doesn't require operating system support, standard C or C++ libraries, or dynamic memory allocation.
The following limitations of TFLm should be considered:
- Support for a limited subset of TensorFlow operations (OPs)
- Necessity of Basic C and C++ runtimes (e.g., printf, memory management, etc.)
- Requirement of a math library for the operation implementation
Please note training is not supported.
Step-by-Step guide how to run Inference at a Target
There are 3 steps for running inference at target:
-
Creating the Model
-
Create or Obtain a TensorFlow Model The model must be small enough to fit on your target device after conversion and it can only use supported operations. You may, however, add your own operations via a custom OP interface.
NeuroPilot optimization/quantization/reduction tool: ML Kit
-
Convert the Model to TensorFlow Lite FlatBuffers Next, convert the model to the standard TensorFlow Lite format using the TensorFlow Lite converter. You may also wish to output a quantized model since these are smaller in size and more efficient to execute. Pre-built models can also be found at Neural Network Models for reference.
Please refer to Post-training quantization for the TensorFlow quantization tool.
-
Convert the FlatBuffers to a C Byte Array The following command shows how to convert the FlatBuffers into a C array of a tflite model by unix builtin tool
xxd.
$ xxd -i mnist.tflite mnist_model.cc -
-
Perform Inference
This section will describe how to convert a model to a char array and execute the inference on Linux x86.
-
Download NeuroPilot-Micro SDK
Extract it.$ unzip Azure-Sphere-MT3620-M4-Samples.zip $ cd Azure-Sphere-MT3620-M4-Samples/MT3620_M4_NeuroPilot-Micro -
Convert the Model
Download theMNISTmodel from Neural Network model list.
Convert themnist.tfliteto a hexdump file namedmnist_model.cc.$ wget http://neuropilot.mediatek.inc/resources/public/latest/en/images/npu_models/mnist.tflite $ xxd -i mnist.tflite mnist_model.ccYou can replace
app/lib_src/simple/mnist_model.ccwith the new model file you generated. -
A Glance at the Code
In this example, there are only three files atapp/lib_src/simple.
-
mnist_model.cc : hexdump of the mnist.tflite.
-
mnist_model.h : header file of mnist_model.cc.
-
main.cc : main file.
This MNIST model needs 22 KB of tensor arena to store all runtime resources.const int tensor_arena_size = 22 * 1024;The input image shape of this model is [1, 28, 28, 1] and output shape is [10].
const int inputTensorSize = 28 * 28;
const int outputTensorSize = 10;
Set up all the operators you need.
You can useAllOpsResolverwhen testing on Linux x86. However,AllOpsResolverrequires too much memory to use on an MT3620, so onlyMicroMutableOpResolvercan be used. More details about resolvertflite::AllOpsResolver resolver;Create an instance of TensorFlow Lite for microcontrollers interpreter.
static tflite::MicroInterpreter static_interpreter(model, resolver,
  tensor_arena, tensor_arena_size, error_reporter);
Allocate runtime resources.
TfLiteStatus allocate_status = interpreter->AllocateTensors();Run the model.
interpreter->Invoke();
-
Build all the Files
Create abuildfolder, generate cmake cache, and build the files.$ mkdir build $ cd build $ cmake .. $ makeIf built successfully,
simple_examplewill be generated in thebuildfolder.

-
Execution
Runsimple_example.$ ./simple_example GetModel done, size 41112 bytes. Get prediction 7. Get prediction 7. Get prediction 7.
-
- Learn more about TensorFlow Lite for microcontrollers: Inference a model by TensorFlow Lite
-
Deploy on the Target
Now that you have been taught how to run the model on the Linux x86, we can now apply this to the MT3620 running a simple example on the RT-core (Cortex-M4F). The following steps will showcase how to build RT-core and execute this on the MT3620.
-
Start Visual Studio.
-
Open RT-core project
SelectFile -> Open -> CMake
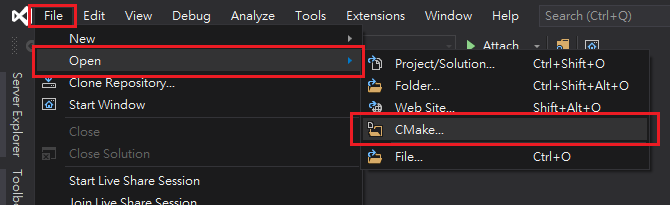
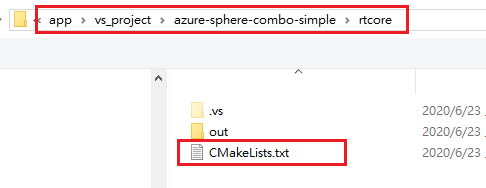
Navigate toapp/vs_project/azure-sphere-combo-simple/rtcoreand selectCMakeLists.txtto open.
-
Change project configuration to
ARM-Release.

-
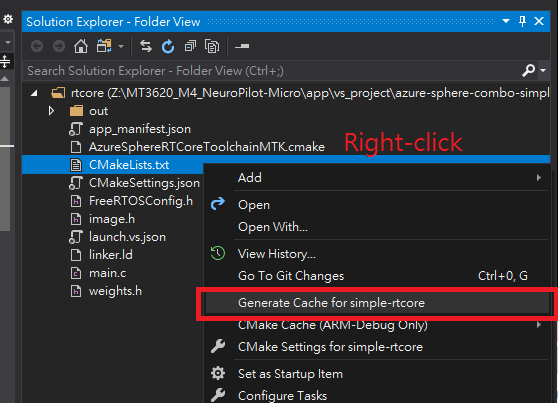
In Solution Explorer, right-click
CMakeLists.txtand selectGenerate Cache for simple-rtcore.
-
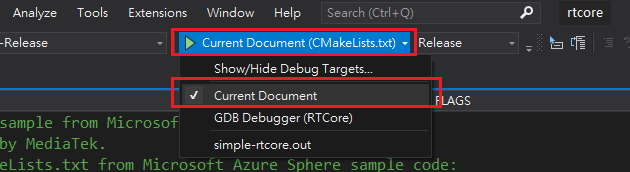
Select
Current DocumentorGDB Debugger(RTCore)inSelect startup item.
-
Press F5 to build and start the RT-core.
-
The log of RTCore will be output through H3-6.
You may use a USB to UART TTL serial cable and a terminal software to read the output. The USB port attaches to your PC. The RX, which is normally the white wire, attaches to the MT3620 H3-6. Set the baud rate to115200. And then, the output log will be printed on the terminal software.predic_label = 1 tick_diff = 55 predic_label = 1 tick_diff = 55The execution time of single
model_invokeis also printed on the terminal software.
If you can only work on Windows x86, please refer to Debug on Windows for additional information.
-
How to Optimize
With NeuroPilot-Micro, and using the MT3620 as an example, the model can utilize Flash to embrace up to 1MB of memory as fast as TCM which is 192KB fast memory. The speed optimization is larger than 3x.
The optimization is turned-on by default but developers will have the opportunity to fine-tune for better performance through the optimization APIs. More information can be obtained by referring to Optimize your Model.
Congratulations!
You are now ready to dive into NeuroPilot-Micro. Here the following topics will be covered:
- Reproducing more complex Demos (Tiny Vision Demo / Dual-Core Processing Demo / Handwriting Recognition Demo) and trying to set up a display panel and camera.
- The NeuroPilot-Micro SDK User Guide provides a better understanding of the MT3620 and NeuroPilot-Micro.
Getting Started: Tiny Vision Demo
With this demo, you will be shown examples for Tiny Vision AI and learn about how easy it can be to execute and optimize a model inference by NeuroPilot-Micro.
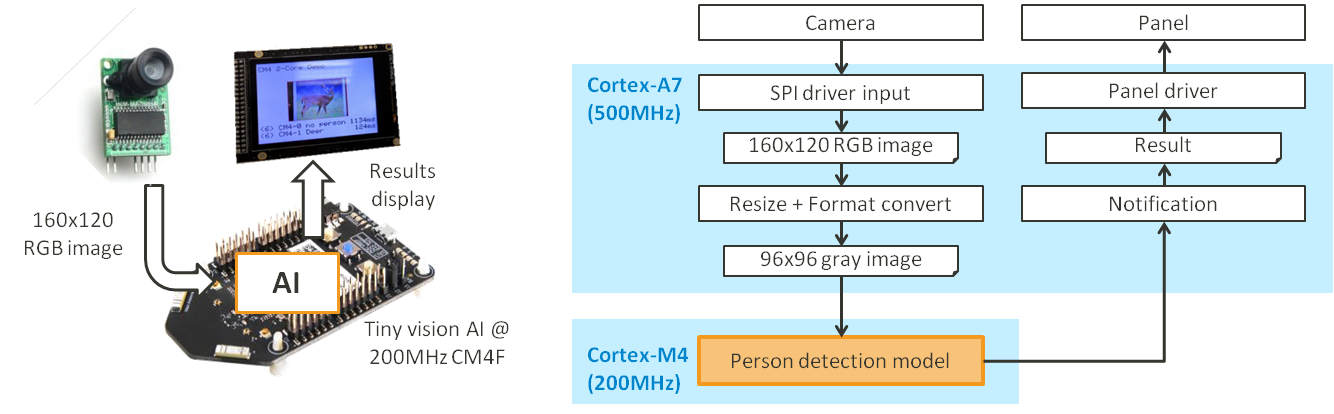
This simple demo platform uses a camera as input for vision-related applications, and an LCD panel to display the captured images and results. The demo also uses Sphere OS running on the Cortex-A7 for camera input and UI drivers.
The camera captures continuous images with larger than 9 FPS (Frame-Per-Second). After receiving the camera input from the SPI driver, it is resized from a QVGA (160x120) RGB image to a 96x96 gray image for person detection input or a 32x32 RGB image for object detection input. The resized input image is then sent to a Cortex-M4 for person detection and then the result is sent back to the Cortex-A7 for display on the panel.
Step-by-Step Guide: Person Detection Demo
The person detection model size is about 250KB and needs approximately 70KB of tensor area for execution. Given that this is too large to run with TCM (192KB max), with NeuroPilot-Micro optimization the model can use serial Flash (up to 1MB), generating a performance that?�s similar to TCM. For more information please refer to the NeuroPilot-Micro User Guide.
The demo platform uses the Seeed MT3620 EVK, a camera, and an LCD panel. To set up the tiny vision demo platform, please refer to Learn More: Tiny Vision Platform.
Please note that when doing the demo, you will need two Visual Studio projects-- one for the RT-core app and another for the HL-core app. NeuroPilot-Micro SDK has already put the Visual Studio projects in app/vs_project/azure-sphere-combo-vision. Following are the steps below will build and deploy both RT-core and HL-core apps. Important: the RT-core app needs to be loaded before the HL-core app.
-
RT-Core App Creation and Execution
- Start Visual Studio.
- Open RT-core project by selecting File -> Open -> CMake, then navigate to app/vs_project/azure-sphere-combo-vision/rtcore and select CMakeLists.txt to open.
- Change project configuration to ARM-Release.
- In Solution Explorer, right-click CMakeLists.txt and select Generate Cache for RT-core.
- In Solution Explorer, right-click CMakeLists.txt and select Build to build the project and generate image package.
- Open CMakeLists.txt and press F5 to start the RT-core app with debugging.
- The log will be output through H3-6 and can use terminal software for reading.
-
HL-Core App Creation and Execution
- Start Visual Studio.
- Open HL-core project by selecting File -> Open -> CMake, then navigate to app/vs_project/azure-sphere-combo-vision/hlcore and select CMakeLists.txt to open.
- In Solution Explorer, right-click CMakeLists.txt and select Generate Cache for HL-core.
- In Solution Explorer, right-click CMakeLists.txt and select Build to build the project and generate image package.
- Open CMakeLists.txt and press F5 to start the HL-core app with debugging.
- The camera image and the result will be shown on the TFT display, the log will be shown in the Visual Studio output window.
Step-by-Step Guide: Object Detection Demo
Object detection is another popular vision application, and both are also supported within the same demo platform. For providing the correct input, the camera image is re-sized to 32x32 RGB. To learn more about the vision demo SDK, please refer to the Tiny Vision Demo User Guide.
Please refer to the person detection demo first, as the step-by-step process is the same, however take note of the following modifications are required:
-
RT-Core App Creation and Execution
- Change ${infer_model} in app/vs_project/azure-sphere-combo-vision/rtcore/CMakeLists.txt from PERSON_DETECTION_DEMO to CIFAR10_DEMO.
-
HL-Core App Creation and Execution
- Change ${infer_model} in app/vs_project/azure-sphere-combo-vision/hlcore/CMakeLists.txt from PERSON_DETECTION_DEMO to CIFAR10_DEMO.
Next Steps
You may want to refer to the other Getting Started and User Guide when learning how to use the SDK.
- Learn more about Tiny Vision SDK: Tiny Vision SDK User Guide
- How to assemble the platfrom? Learn More: Tiny Vision Platform
- Learn more about NeuroPilot-Micro: Getting Started: NeuroPilot-Micro
Getting Started: Dual-Core Processing Demo
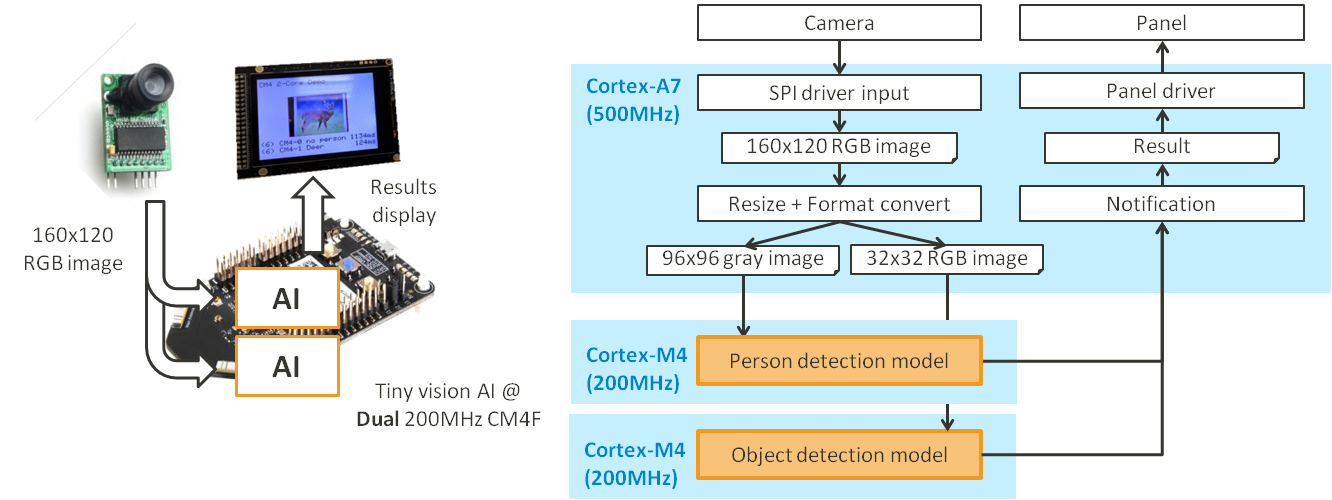
MT3620 has two powerful Cortex-M4 cores (RT-cores) enabling it to execute two models concurrently for enhanced real-time performance. This demo uses one core for person detection and the other core for object detection. These two models run at the same time and not sequentially: thus, each model continues to operate independently at its own speed and will not be impacted by the load of the other.
The demo platform is the same as the tiny vision demo with dual-core processing enabled. Please refer to Learn More: Tiny Vision Platform for more information.
For providing both models with separate input, the input image is resized to two images. One is 96x96 grayscale for person detection and the other is 32x32 RGB for object detection.
The two images are then sent to the corresponding Cortex-M4s (RT-core) for model execution. Additionally, the two results are collected by Sphere OS using the Cortex-A7 (HL-core) for display.
Please refer to the Dual-Core Demo User Guide to learn more.
Step-by-Step Guide
The demo needs three Visual Studio Projects consisting of the following: one for each of the RT-core apps and another for the HL-core app. It also requires an Azure Sphere SDK command line window. The NeuroPilot-Micro SDK has already put the Visual Studio projects in app/vs_project/azure-sphere-combo-2core. The following steps build and deploy the two RT-core apps and HL-core apps. Important: the RT-core apps need to be loaded before the HL-core app.
-
RT-Core App for Core-1
- Start Visual Studio.
- Open RT-core project by selecting File -> Open -> CMake, then navigate to app/vs_project/azure-sphere-combo-vision/rtcore and select CMakeLists.txt to open.
- Change project configuration to ARM-Release.
- In Solution Explorer, right-click CMakeLists.txt and select Generate Cache for RT-core.
- In Solution Explorer, right-click CMakeLists.txt and select Build to build the project and generate image package.
- The output image package is located at app/vs_project/azure-sphere-combo-2core/rtcore/out/ARM-Release/azure-sphere-combo-cifar10-rtcore.imagepackage.
-
RT-Core App for Core-2
- Start Visual Studio.
- Open RT-core project by selecting File -> Open -> CMake, then navigate to app/vs_project/azure-sphere-combo-vision/rtcore and select CMakeLists.txt to open.
- Change project configuration to ARM-Release.
- In Solution Explorer, right-click CMakeLists.txt and select Generate Cache for RT-core.
- In Solution Explorer, right-click CMakeLists.txt and select Build to build the project and generate image package.
- The output image package is located at app/vs_project/azure-sphere-combo-2core/rtcore_2/out/ARM-Release/azure-sphere-combo-cifar10-rtcore-2.imagepackage.
-
HL-Core App
- Start Visual Studio.
- Open HL-core project by selecting File -> Open -> CMake, then navigate to app/vs_project/azure-sphere-combo-vision/hlcore and select CMakeLists.txt to open.
- In Solution Explorer, right-click CMakeLists.txt and select Generate Cache for HL-core.
- In Solution Explorer, right-click CMakeLists.txt and select Build to build the project and generate image package.
- The output image package is located at app/vs_project/azure-sphere-combo-2core/hlcore/out/ARM-Debug-5+Beta2004/azure-sphere-combo-cifar10-hlcore.imagepackage.
-
Side load to MT3620
- Open Azure Sphere SDK command line window.
- Deploy rtcore-0 image by enter "azsphere device sideload deploy --imagepackage azure-sphere-combo-2core\rtcore\out\ARM-Release\azure-sphere-combo-cifar10-rtcore.imagepackage".
- Deploy rtcore-1 image by enter "azsphere device sideload deploy --imagepackage azure-sphere-combo-2core\rtcore_2\out\ARM-Release\azure-sphere-combo-cifar10-rtcore-2.imagepackage".
- Deploy HL-core by Visual Studio open CMakeLists.txt and press F5 to start the HL-core app with debugging.
Next Steps
The Getting Started and User Guide are also useful when learning how to use the SDK.
- Learn more about dual-core processing SDK: Dual-Core Processing SDK User Guide
- How to assemble the platfrom? Learn More: Tiny Vision Platform
- Learn more about NeuroPilot-Micro: Getting Started: NeuroPilot-Micro
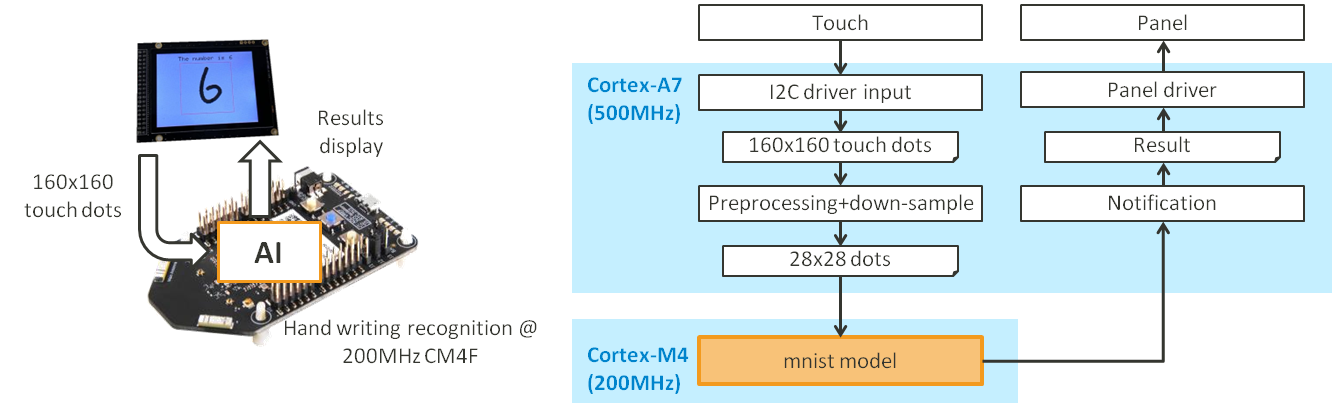
Getting Started: Handwriting Recognition Demo
The demo using the MNIST model can recognize hand-written numbers through the following process: user writes a number input via the touch panel. Then pre-processing and down-sampling from a 160x160 array to 28x28 array. The array is sent to the Cortex-M4 for MNIST model recognition. After it calculates the result, the Cortex-M4 notifies the Cortex-A7 to display the result.
To setup the handwriting demo platform, please refer to Learn More: Handwriting Recognition Platform.
Step-by-Step Guide
Two Visual Studio projects are needed: one for the RT-core app and another for the HL-core app. The NeuroPilot-Micro SDK has already put the Visual Studio projects in app/vs_project/aazure-sphere-combo-mnist. The Following are the steps to build and deploy the RT-core and HL-core apps. Important: the RT-core app needs to be loaded before the HL-core app.
-
RT-Core App Creation and Execution
- Start Visual Studio.
- Open RT-core project by selecting File -> Open -> CMake, then navigate to app/vs_project/azure-sphere-combo-mnist/rtcore and select CMakeLists.txt to open.
- Change project configuration to ARM-Release.
- In Solution Explorer, right-click CMakeLists.txt and select Generate Cache for RT-core.
- In Solution Explorer, right-click CMakeLists.txt and select Build to build the project and generate image package.
- Open CMakeLists.txt and press F5 to start the RT-core app with debugging.
- The log will be output through H3-6 and can use terminal software for reading.
-
HL-Core App Creation and Execution
- Start Visual Studio.
- Open HL-core project by selecting File -> Open -> CMake, then navigate to app/vs_project/azure-sphere-combo-mnist/hlcore and select CMakeLists.txt to open.
- In Solution Explorer, right-click CMakeLists.txt and select Generate Cache for HL-core.
- In Solution Explorer, right-click CMakeLists.txt and select Build to build the project and generate image package.
- Open CMakeLists.txt and press F5 to start the HL-core app with debugging.
- The camera image and the result will be shown on the TFT display, the log will be shown in the Visual Studio output window.
Next Steps
The Getting Started and User Guide are also useful when learning how to use the SDK.
- Learn more about handwriting recognition SDK: Handwriting Recognition SDK User Guide
- How to assemble the platfrom? Learn More: Handwriting Recognition Platform
- Learn more about NeuroPilot-Micro: Getting Started: NeuroPilot-Micro
Learn More: Tiny Vision Platform
The Tiny Vision platform requires an MT3620 development board, a compatible camera and display. The camera should support, at a minimum, a QVGA (160x120) RGB image capture for supporting both object detection (32x32, RGB) and person detection (96x96, gray). A recommended display resolution of VGA or greater is desirable for the best user interface experience.
Demo platform components (with links):
- Seeed MT3620 Development Board
- Arducam 2MP OV2640 Mini Module SPI Camera
- TFT Capacitive Touch Screen
The image below is from https://wiki.seeedstudio.com/Azure_Sphere_MT3620_Development_Kit/.
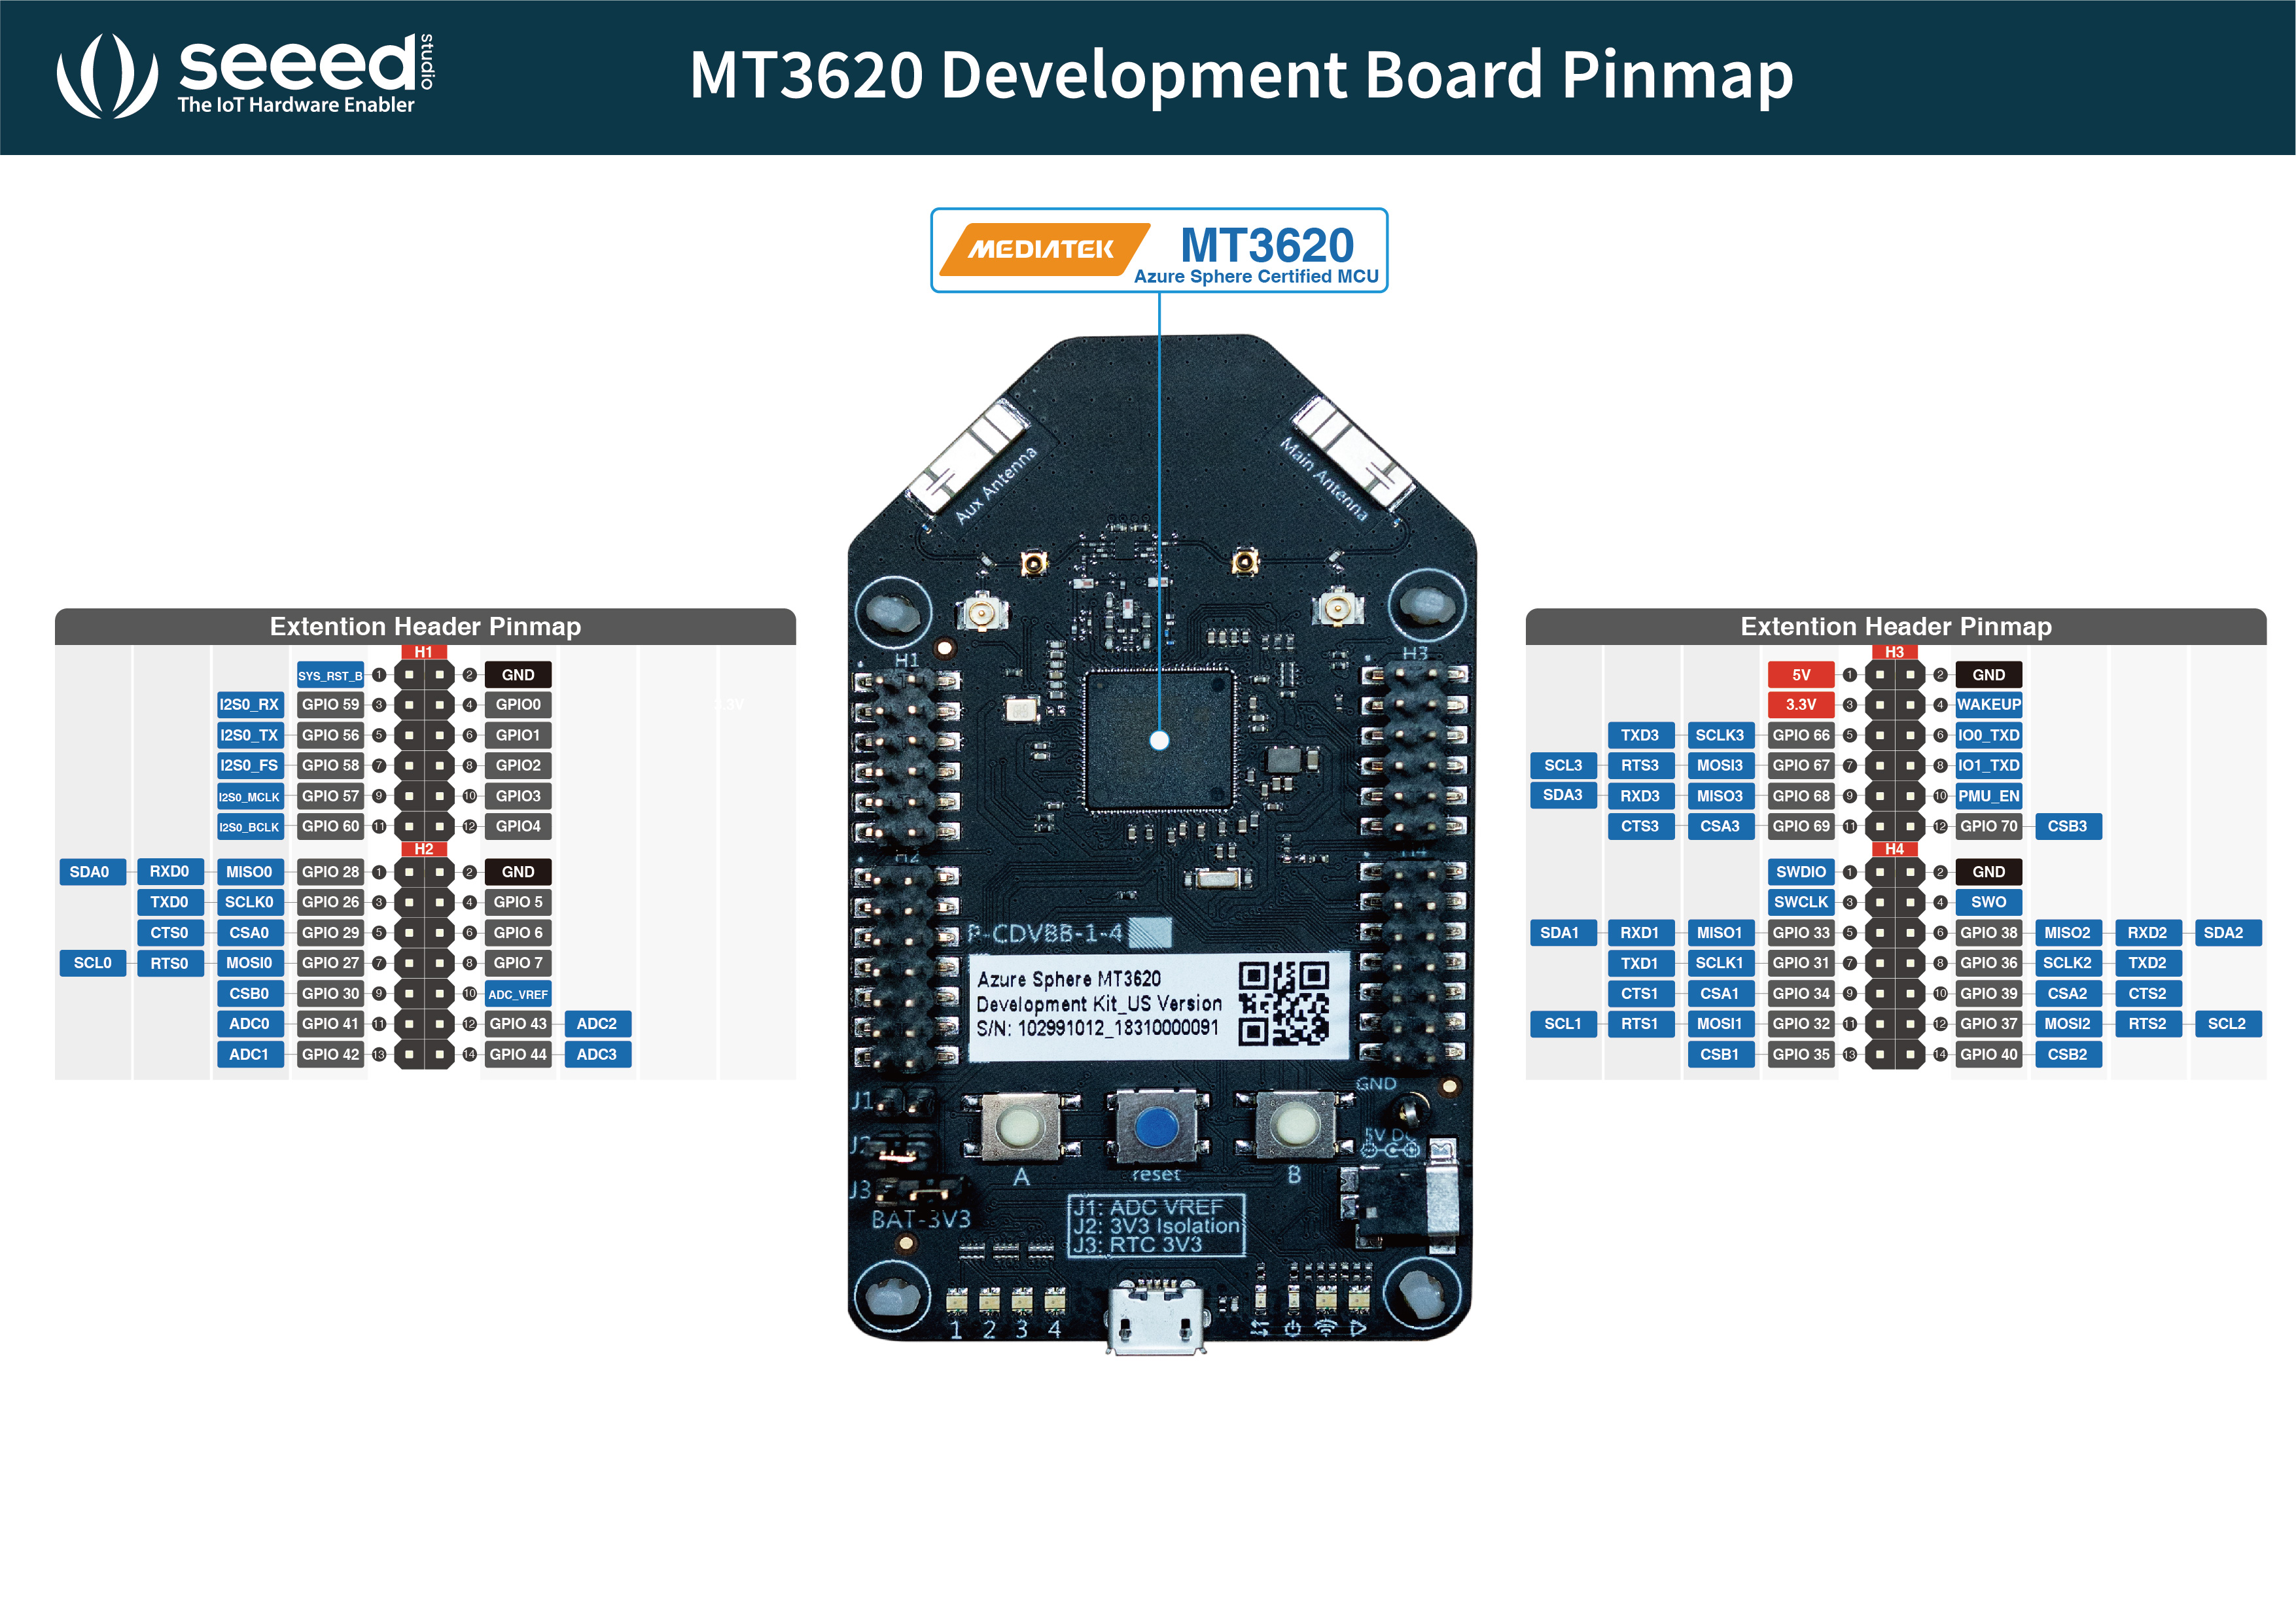
Arducam 2MP OV2640 Mini Module SPI Camera and a 2.8 inch TFT Capacitive Touch Screen with the configuration, Pin Header Connection-4-Wire SPI, VDD=3.3V, and a 2.8 inch Capacitive Touch Panel.
The following are the connections to setup the camera and display hardware.
ArduCam Connections
| ArduCam mini 2MP Plus | RDB | MT3620 |
|---|---|---|
| SCL | H2-7 | GPIO27_MOSI0_RTS0_CLK0 |
| SDA | H2-1 | GPIO28_MISO0_RXD0_DATA0 |
| VCC | H3-3 | 3V3 |
| GND | H3-2 | GND |
| SCK | H4-7 | GPIO31_SCLK1_TXD1 |
| MISO | H4-5 | GPIO33_MISO1_RXD1_DATA1 |
| MOSI | H4-11 | GPIO32_MOSI1_RTS1_CLK1 |
| CS | H1-10 | GPIO3 |
TFT Connections
| ER-TFTM028-4 Pin | Name | RDB | MT3620 |
|---|---|---|---|
| 1 | GND | H4-2 | GND |
| 2 | VCC | J3-3 | 3V3 (Jumper on 1-2 with CR2032 battery) |
| 21 | RST | H1-4 | GPIO0 |
| 23 | CS | H3-11 | GPIO69_CSA3_CTS3 |
| 24 | SCK | H3-5 | GPIO66_SCLK3_TXD3 |
| 25 | DC | H1-6 | GPIO1 |
| 27 | SDI | H3-7 | GPIO67_MOSI3_RTS3_CLK3 |
| 28 | SDO | H3-9 | GPIO68_MISO3_RXD3_DATA3 |
| 29 | BL | H1-8 | GPIO2 |
Next Steps
The Getting Started and User Guide are also useful when learning how to use the SDK.
- How to reproduce the demo? Tiny Vision SDK User Guide
Learn More: Handwriting Recognition Platform
The Handwriting Recognition Platform requires an MT3620 development board and a touch display. The touch resolution should be higher than 160x160 for input quality and a recommended display resolution of VGA or greater for the best user interface experience.
Demo platform components (with links):
The Handwriting Recognition Platform uses the same TFT display as Tiny Vision Platform. The following connections are used for the touch panel:
Touch Connection
| ER-TFTM028-4 Pin | Name | RDB | MT3620 |
|---|---|---|---|
| 30 | SCL | H4-12 | GPIO37_MOSI2_RTS_SCL2 |
| 31 | SDA | H4-6 | GPIO38_MISO2_RXD2_SDA2 |
Next Steps
The Getting Started and User Guide are also useful when learning how to use the SDK.
- How to reproduce the demo? Handwriting Recognition SDK User Guide
Learn More: MT3620 Development Board
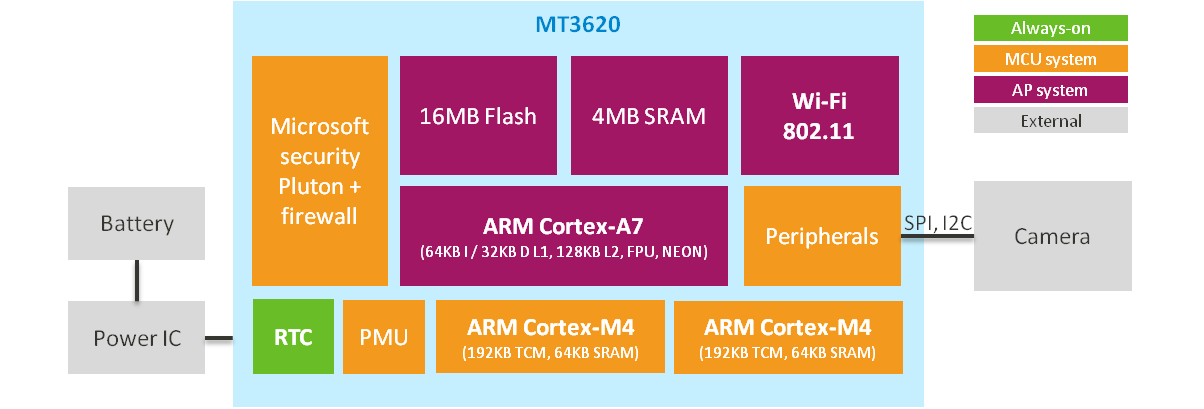
The MT3620 is a highly integrated, heterogeneous tri-core MCU specifically designed to meet the requirements of modern and robust internet-connected devices. It leverages the Microsoft Azure Sphere security architecture to provide an unprecedented level of security to connected device manufacturers. For setup and development of MT3620 compatible applications, please refer to the Microsoft Azure Sphere Document.
The following is a block diagram of the MT3620. The ARM Cortex-A7 (HL-core) hosts the Azure Sphere operating system and high-level user applications. NeuroPilot-Micro demo uses the Cortex-A7 to communicate with peripherals, such as camera and display. There are also two ARM Cortex-M4 cores with a dedicated 192KB TCM per core; 64KB SRAM; and integrated FPU. There is also 1MB Flash, which is shared by the Cortex-A7 and two Cortex-M4 cores. For inter-core communication, the MT3620 provides 1KB shared memory between the Cortex-A7 and Cortex-M4 cores.
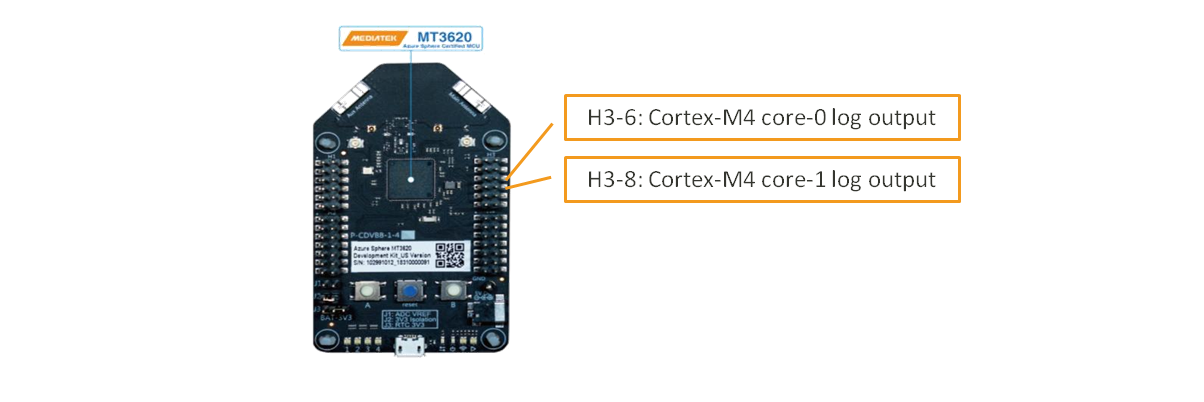
There are also different types of MT3620 development boards. The NeuroPilot-Micro SDK uses the Seeed Azure Sphere Development Kit for easy peripheral connection. The following image shows the development board pin-out, highlighting the MT3620 TTL to the USB transmission pins for output of the Cortex-M4 log. The Cortex-M4 core-0 output is H3-6 and core-1 output is H3-8 respectively.
Next Steps
The Getting Started and User Guide are also useful when learning how to use the SDK.
- Learn more about MT3620: MT3620 Datasheet
- Learn more about Microsoft Azure Sphere: Microsoft Azure Sphere Document